
Home
Projects
Site Map
New/Updated Pages
Contact Me
Riding Journal
Restoring a Classic
Roughly 21 years ago, my friend, Roj, was involved with another friend of mine, Pam. The three of us flatted together in a house in the Frankton suburb of Hamilton.Our landlord at the time had an old Zundapp Bella 154 scooter - 150cc single cylinder 2-stroke - that had obviously seen better years.
Most of them prior to 1960, I suspect.
Roj and I were both avid bikers and Pam had expressed a desire to learn to ride so Roj bought the old Zundapp off the landlord as a cheap bike for Pam to learn on.
It was in quite a state: someone had painted most of it a uniform grey using house paint. In places the grey had flaked off revealing different colours underneath. The battery was an old car battery resting on an old beer crate that was hacked up to fit over the raised area between the front shield and the engine cover. The original battery compartments either side of the steering column were clogged with a mess of tangled wires and the ignition switch and lights-and-indicator switch assembly from a car had been crudely bolted to them. Dome-type indicator lenses of the type used on old cars were bolted to the bike and crudely wired into the switch. The vinyl on the seat had split and the foam underneath was perishing. The spark plug was screwed into a threaded brass ring which in turn was screwed into a large hole in the head of the bike. To cap it all off, the front tyre turned out to be from a wheelbarrow and was not rated for anything like the bike's 45mph top speed.
Despite all this, the thing ran quite well. Put the key in the ignition switch, turn it and the starter motor would whir and the engine would fire into life.
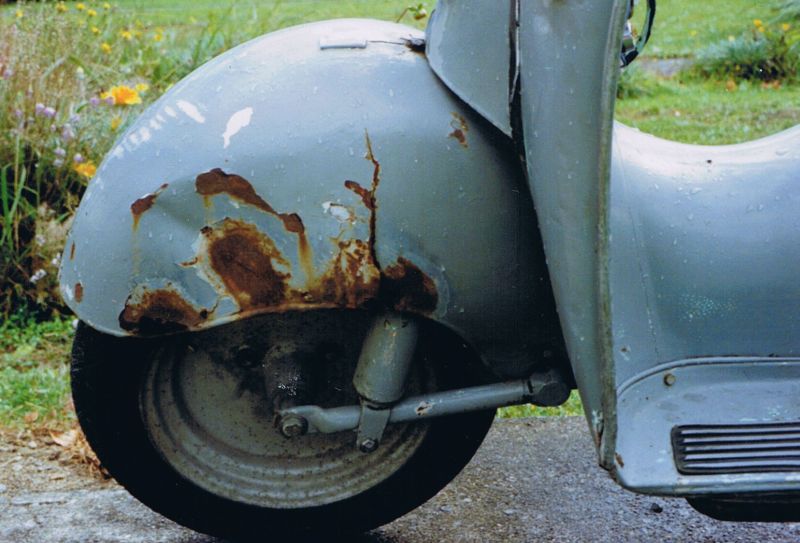
Pam used to ride the bike around the rather large section. One day she let my girlfriend at the time, Kerry, have a ride. Kerry did not know how to put the bike in neutral or turn it off so she laid it on its side where it idled very quietly until Pam came along. Pam saw the bike on its side and couldn't hear it running so she thought it must have been turned off. She picked it up and as soon as the rear wheel made contact with the ground it took off, wrenching the throttle in her hand as it did so. The throttle opened and the bike roared, riderless, straight into the side of the house, causing serious damage to the front fender:
Pam kept the bike for a number of years and then sold it to me. By this stage it hadn't been started for a while but it fired up quite agreeably when given petrol and a jump-start. The battery was still taking and holding a charge so I rode it as it was when I got it for a while. Unfortunately, though, the battery on its beer crate was right between my legs and as I leaned into the corners it spilled battery acid onto my $150 Levis and my $110 sheepskin boots and ruined them.
I decided that the battery would have to go and figured it would be cheaper to buy the twin six-volt motorcycle batteries to mount in the battery cases than to keep replacing jeans and boots. I also figured that while I was at it I'd get rid of the ugly lights-and-indicator switch assembly and replace it with a proper handlebar-mounted switch.
The rear tail light assembly was a bit of a mess and I wanted to wire up a brake light as well so that got added to the list of things to do. The bike was old enough that it did not legally require a brake light (or indicators, for that matter) but a brake light is a lot more visible to traffic at night than a raised hand is.
I went down to "Bikes 'n' Bits" motorcycle dismantlers in Frankton (it's now Supacross Cycles, where I purchased my current XT225) to find parts. They were very good: I told them I wanted a switch unit and tail light, they asked "For what?" and I said "A 1950's German scooter, I just need something that will fit" and they kindly let me out the back to fossick around in the spare parts shelves. I found the left hand switch assembly from a Suzuki and the tail light assembly from a Yamaha RD350 (the model sticks in my memory because I had owned one previously).
I bought a pull-type switch designed to be used as a brake light switch - just a generic part - and a couple of six-volt motorcycle batteries of appropriate dimensions to fit inside the battery cases (with a bit of foam padding) along with wire, crimp connectors and assorted oddments that I perceived as required and set to work. I also bought a pair of replacement hand grips as the originals were in tatters.
When I was finished, the ugly switch unit that turned the lights on and off, selected low or high beam, triggered the indicators and activated the horn was gone - replaced by an on-off toggle switch for the lights (mounted in place of the bike's original but defunct ignition switch) and a handle-bar mounted switch assembly with high-low selector, indicator and horn switches. The wiring had been tidied up so the two six-volt batteries, wired in series to provide the twelve volts for the starter motor, could actually fit in the battery cases.
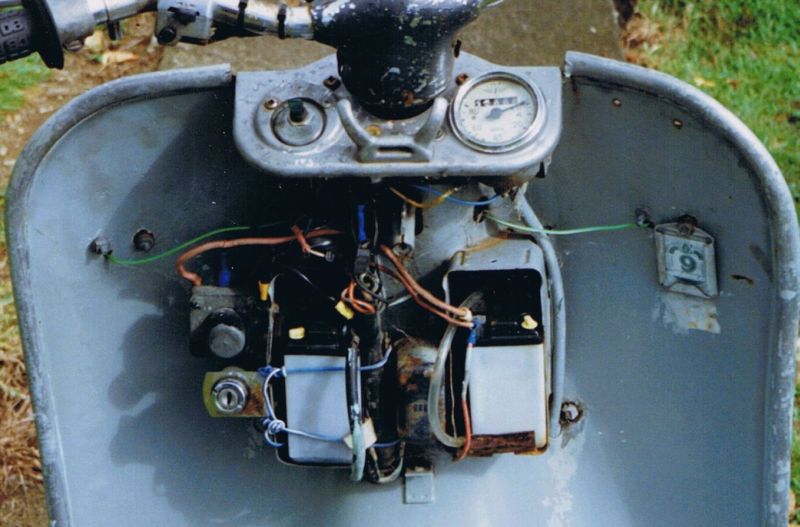
Believe me, the above is an improvement on how it was when I got it. I kept the car ignition switch and solenoid (both bolted to the left of the left battery compartment) for want of a suitable replacement for either.
Replacing the original rear tail light assembly with the one from the RD350 was a simple matter but mounting the brake light switch was a study in Kiwi ingenuity: A length of "Number 8 wire" (8-gauge wire) poked through the bolt hole in the end of the switch and wrapped around one of the frame supports; the spring on the switch was hooked into a loop of wire that I had affixed to the rear brake actuator rod by binding it with strong thin twine. Obviously only the rear brake activated the brake light as I had no means of fitting a switch to the front brake.
I'm not sure when, but one other electrical repair I did to the bike was to replace the corroded and erratic horn with one of the horns off an old Triumph Herald. The "new" horn was louder and deeper in tone than the old one.
At some early stage of my long relationship with the bike, I had managed to locate fairly hard composition tyres of the right size and, so far as I recall, they lasted the whole time I had the bike. I got them cheap because the demand for them was practically non-existent and the one bloke in town who had them no longer wanted them taking up space on his shelves.
My father fixed the upholstery on the seat - replaced the damaged area of foam and covered it. The only scrap of vinyl he had was Navy Blue but at least it was waterproof.
Another minor problem I had was that the plastic ring that was supposed to secure the carburettor to the inlet manifold was broken. I fixed it by wrapping duct tape around it and used a bit of wire to clamp it down on the manifold.
And that was the state of the bike as I rode it for a good number of years. I commuted to and from work, visited friends, rode to my uncle's farm out near Waingaro Springs a multitude of times, courted various women and took them on dates on it and did my shopping. It ran fine and gave years of reliable service, asking little more of me than occasional top-ups of engine oil and the appropriate mix of petrol and two-stroke oil in the tank.
A friend of mine from Germany, Axel, frequently came over to New Zealand to tour the country by bicycle. He was most impressed with the old Zundapp as he had never seen one running in his own country.
Somewhere along the line I located an original Owner's Manual and was able to find out which spark plugs it should be running. By chance I located some of the proper Bosch plugs and the bloke sold me all he had (nearly an entire box) for very little as I was the only person who'd asked for them for years.
I only ever had two major problems with the bike. One was the brass ring around the spark plug, it would come out when I removed the plug and I'd have a hard job getting it off the plug. The knurled lip around the top above the screw thread was getting buggered by the pliers I was using to remove it from the spark plug thread. The other problem was the points - there were no replacement parts to be had. Not even Tom McCarron in Rukuhia with his extensive collection of old motorcycles and cars knew where I could get some.
There was a point when the bike stopped running, as the points were completely spark-eroded away. Someone then suggested a guy called Brent at Ashford Motors - they said he was good and could probably build me a set of points. They also said he could probably machine another insert for the spark plug as well (the brass one was getting quite buggered by now). I gave him a call and he told me to take the points out of the bike and strip the head off and bring it to him.
Being a 2-stroke single, getting the head off was only a matter of four bolts but my concern was that I would need to replace the head gasket - I couldn't locate points, where would I find a head gasket?
I took the head off and was alarmed to discover the bolts were little more than finger tight - they required hardly any effort to remove. As the engine was hidden away under a cowl, I had failed to notice that oil and gasses had been leaking out around the head for ages. It's surprising the bike had been running - its compression must have been appalling.
I was thinking that I would probably have to make my own gasket out of cardboard (years of watching my father do this gave me a fair idea of how to do it) but the original one seemed to be intact and, when I wiped the oil off, it turned out to be a metal gasket and still in near perfect condition, despite the fact the head had not been properly torqued down.
I took the head and points out to Brent at Ashford motors. Brent turned out to be quite a young guy and Ashford Motors turned out to be his garage.
Brent quickly determined that the brass ring had been installed by a previous owner. The hole in the head was off-centre - obviously inexpertly drilled out (probably because the original thread had stripped) and tapped to accommodate the brass ring. The spark plug, seated in the ring, was not extending down below the inner surface of the head so, as Brent pointed out, the spark was not igniting the mix properly. It was indeed a miracle that the bike was actually running.
It was excellent watching Brent work. He was an old-fashioned craftsman who took pride in his work and knew what he was doing; he measured precisely and worked confidently. He drilled a new hole in the head - properly centred this time - countersunk it and threaded it. Then he machined a steel plug on his lathe, a stubby "T" in cross-section with a hole through the centre, and threaded the narrow bit to fit the threaded hole in the head. The inner hole he threaded to fit the spark plug and he checked to make sure that when the spark plug was screwed in the terminals projected just past the lower face of the steel plug. As I watched him work I began to suspect he was an older bloke hidden in a young man's body. It was unbelievable to me that such a young guy would take such pride in his work.
The machined plug fitted perfectly in the hole he'd made in the head so he extracted it, squirted Loctite on it and screwed it back in using the spark plug to turn it in tight. Once finished you had to look really close to see the join between the edge of the plug he had machined and the head itself - inside or out. It looked as if the head had been cast in that shape.
Then he turned his attention to the points. He fossicked around in a box of assorted points bits until he found a rocker-style point that was approximately the right shape and size to replace the one on mine and proceeded to reshape it to the same as the original. The fixed points were a different matter as he had nothing remotely the right shape. All he could do was drill out the eroded point and thread the hole. He then screwed a grub-screw type point into it and locked it in place with a small nut, to apply pressure, and a little Loctite. It wasn't the most attractive solution but at least I had points again.
Old fashioned craftsmanship, old fashioned pride in his work and an old fashioned price, too - he did not charge me a lot at all.
I took my bits home, reinstalled the points and torqued down the head using a borrowed torque wrench. I had no reference manual so I tightened the head to a level recommended to me by one of the engineering staff at work.
To my delight, the bike ran again - better than it ever had. It had more power, for a start. I was able to commute to work and visit my friends again.
By and by, I felt that the bike had given me so much and I should really do something about restoring it properly. The big problem was that I had no garage in which to strip the bike and work on it for the duration of the project - which was likely to be quite a while as my income was limited. Another problem was: "What would I ride while it was off the road?"
One of my workmates, Maureen, was constantly saying "you really should fix that bike up properly rather than let it fall further into disrepair," and I said that I wanted to but I had nothing else to ride and nowhere to work on it. Maureen then offered me the loan of her little motorbike and the use of her garage. I warned her that it was likely to take ages and she said she didn't mind.
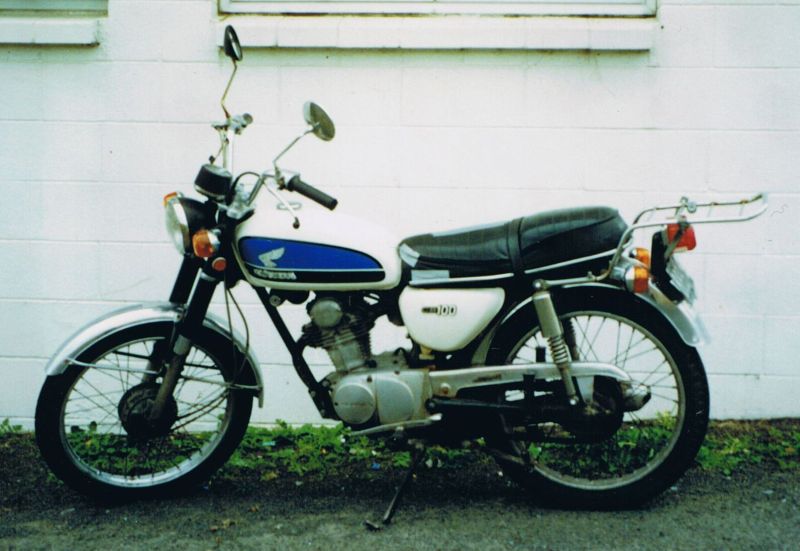
This is the Honda CB100 that Maureen loaned me while my Zundapp was in pieces in her garage.
OK, a bit of history of my repairs:
I'd adjusted chains, taken exhaust pipes off for cleaning, removed and stripped carburettors and reassembled them again, my dad had made me do more valve grinds than I care to recall as a kid, and I'd had the Zundapp apart far enough to totally rewire it, secure the carburettor to the inlet manifold with duct tape, install the brake light switch, adjust (and, later, replace) the points and remove the head. I was not mechanically inept but I was not overly experienced, either - and now I was proposing to strip the entire bike right down and rebuild it with no workshop manual.
My plan was simple - start at the outside and work inwards until it was stripped, take notes and make diagrams where appropriate, label and store the bits appropriately and take lots of photos so I could refer to them later.
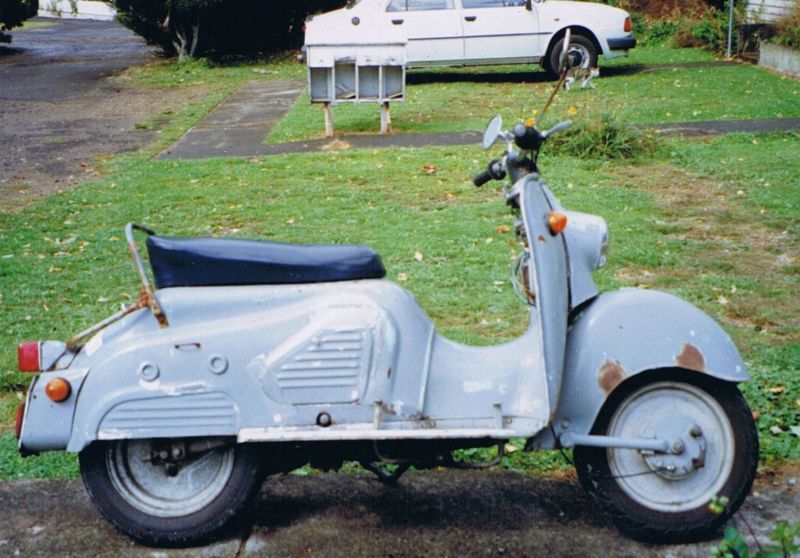
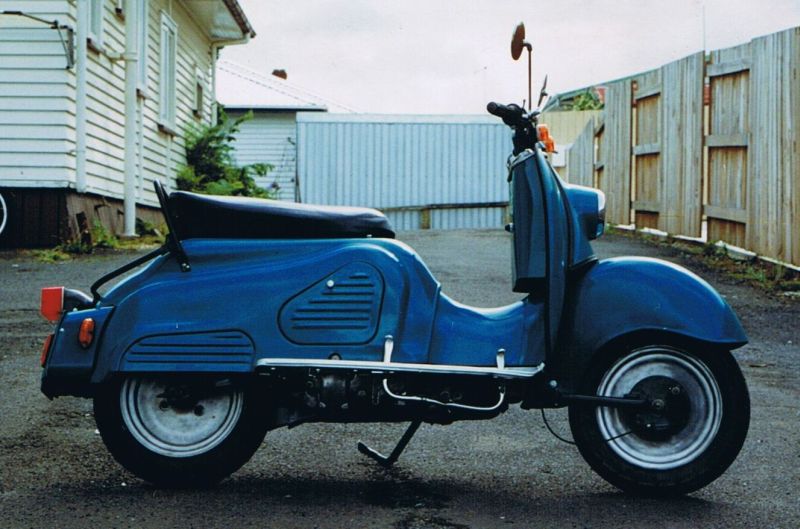
I took some "Before" photos of the bike then rode it to Maureen's house.
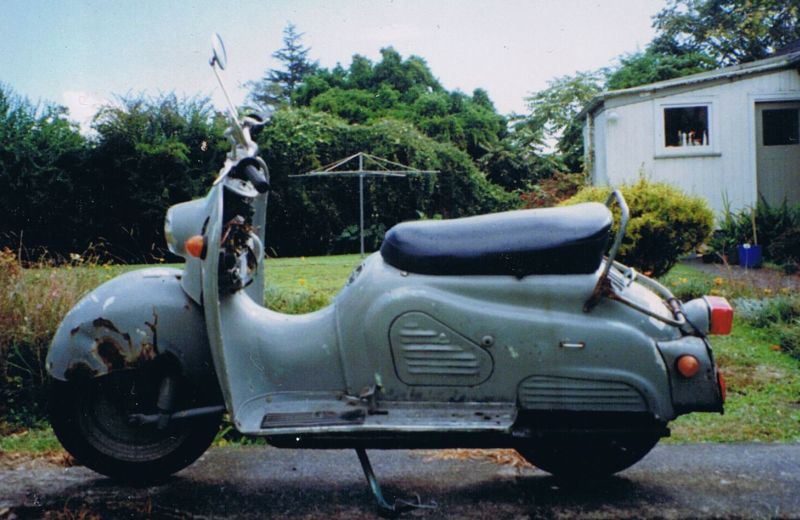
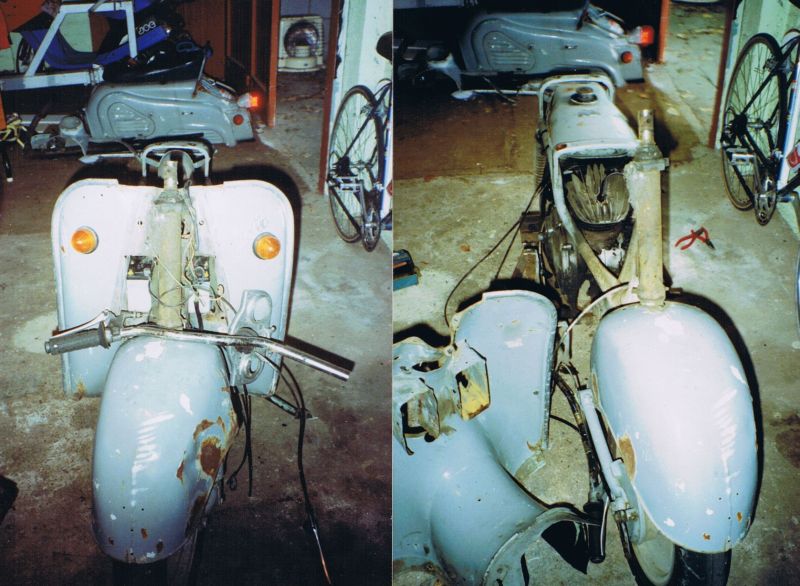
Left side, showing the ravaged front fender, the laughable indicators, the left side door that gives access to the petrol tap, the rear brake foot lever and the exhaust. The vaguely rectangular object at the rear of the bike is a tool compartment.
Right side, revealing the rocker-style gear shift and the right side door that housed the air filter.
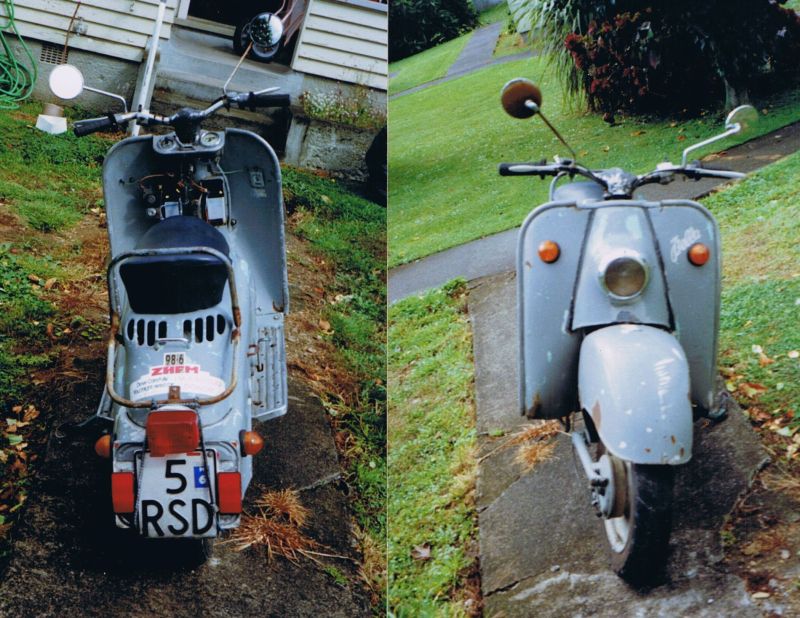
Rear view, affording a good view of the RD350 tail light and revealing that the tool compartment was held closed by a bungee cord.
Front view, showing the "Bella" badge - I had painstakingly scraped the grey house paint off it - and the aluminium trim around the outside of the front shield. The lovely golden colour of the headlamp was rust.
Stripping the outer bits off the bike was simple - I'd done them before. The engine cowl came off, then the tank, foot platforms and exhaust.
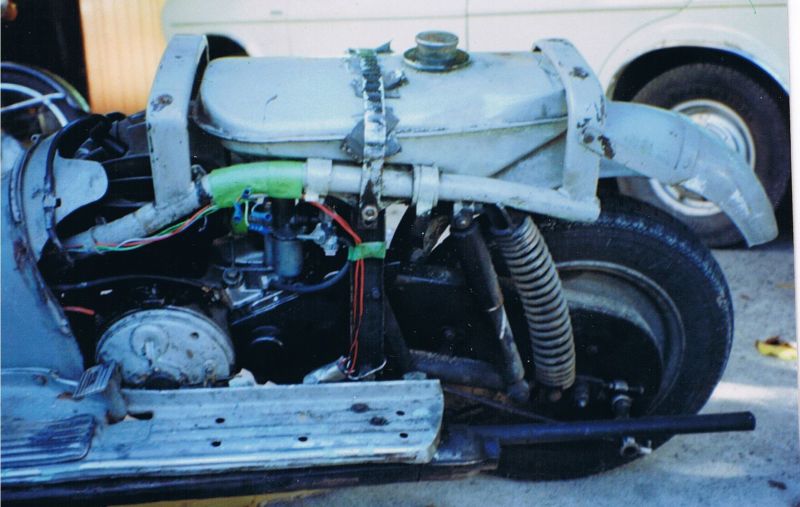
Engine cowl removed. Those who have read my story about the trip to Whangarei and back will note where the muffler is in relation to the foot platform...
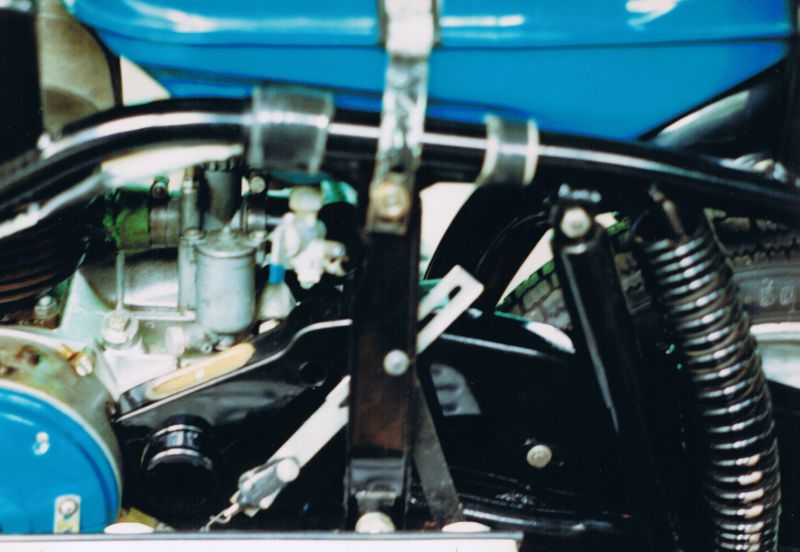
Tank, foot platforms and exhaust removed giving a good view of my makeshift brake switch mount and the extensive use of duct tape. The duct tape manifold seal is clearly visible between the head and the carburettor.
I rolled it into the garage and put it up on metal stands to hold it upright while I began serious work. I removed the headlamp assembly, handlebars and front shield and then dropped out the front suspension along with wheel and front fender.
The more observant will notice that the tank is back on the bike but not fastened down - I had nowhere else to put it so I put it on the bike and used it as a small bench for my tools.
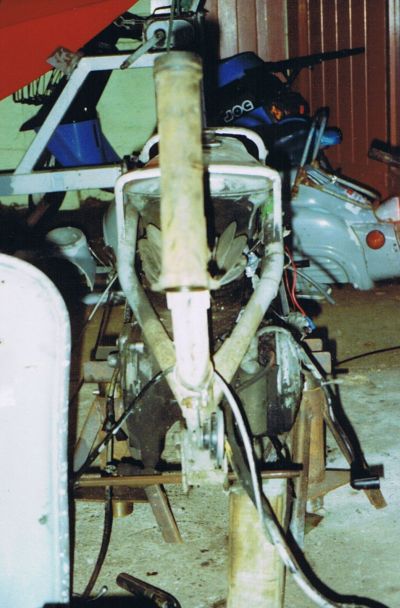
Front end removed.
Maureen's daughter came downstairs and ordered me to come upstairs and clean up for dinner. Maureen is New Zealand-born Chinese and takes hospitality seriously.
Having dinner with Maureen and her family became part of the routine of working on the bike - I became very adept at eating with chopsticks while I was working on that bike. One night Maureen set me the task of making the wontons for dinner and I'm happy to report that there were no lasting ill effects on anyone.
Over time I stripped the bike down - drawing diagrams, taking copious photos, labelling wires and carefully storing the bolts, nuts and washers. I compiled a list of any bolts that were too damaged to be used again and made notes of other things I would need.
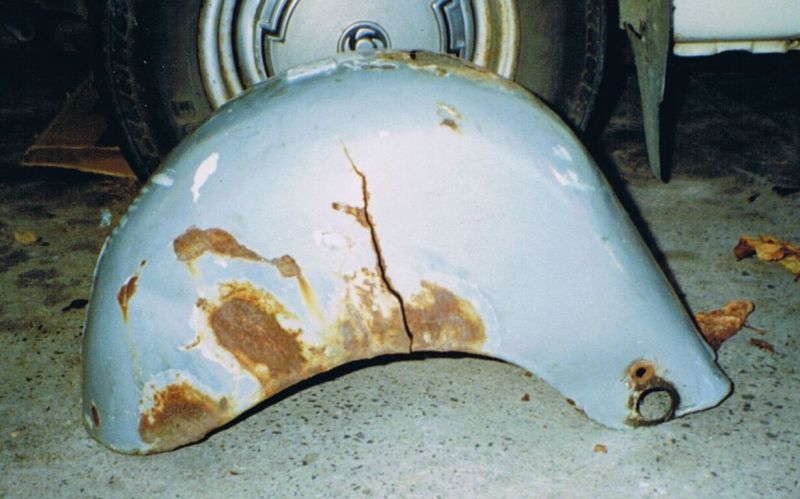
Front fender showing the extent of the tear up the side.
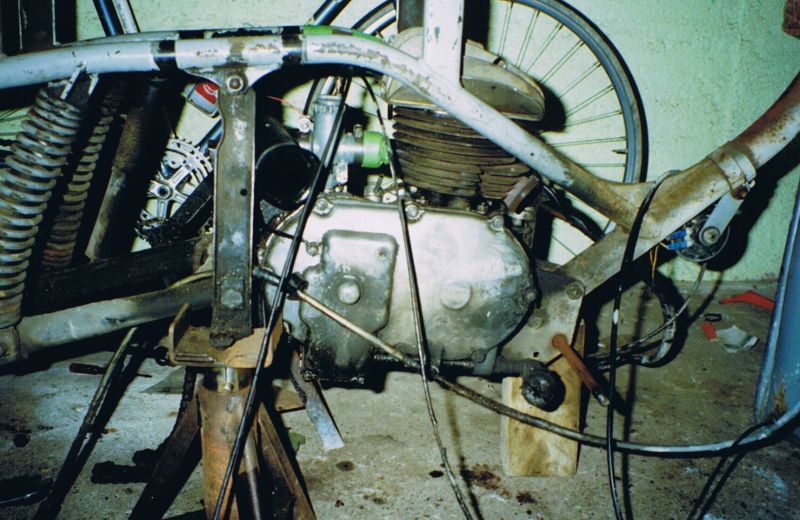
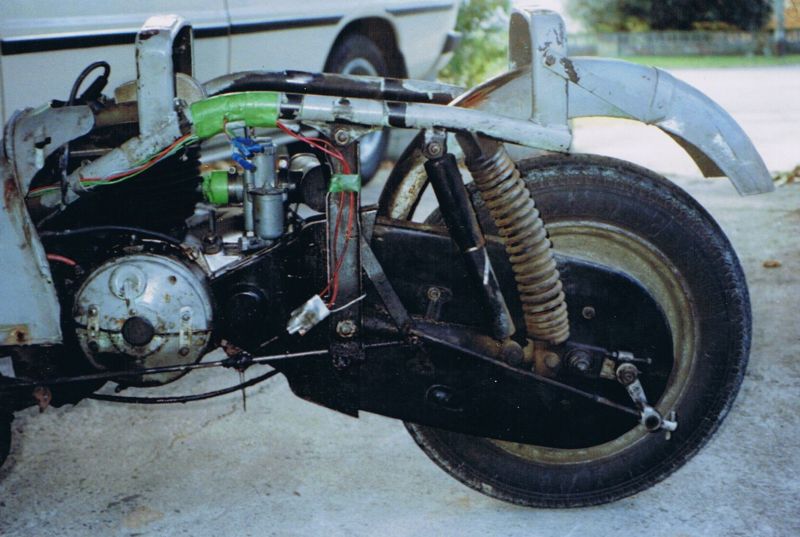
Right side. Gear lever, rear wheel, chain and chain guard removed.
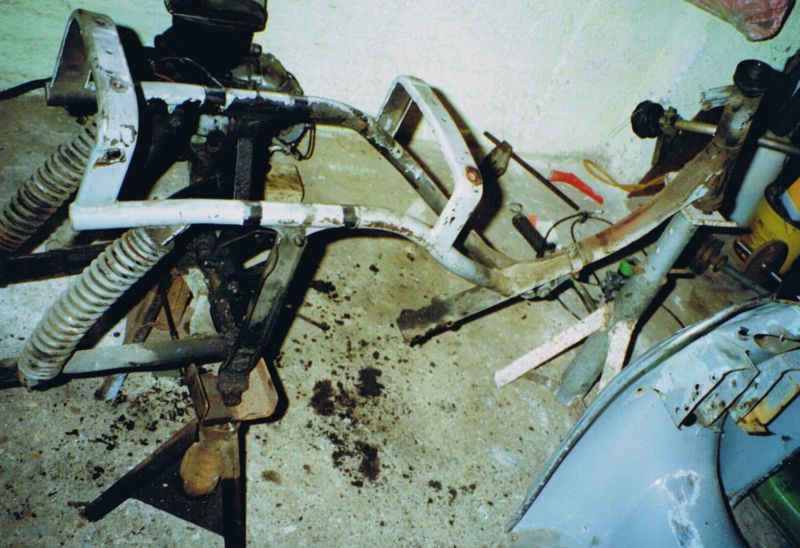
Engine removed. Only a few more bolts and the frame is completely disassembled.
Other work had to be done, too - stripping the pieces from the engine cowl and removing the aluminium trim and "Bella" badge from the front skirt.
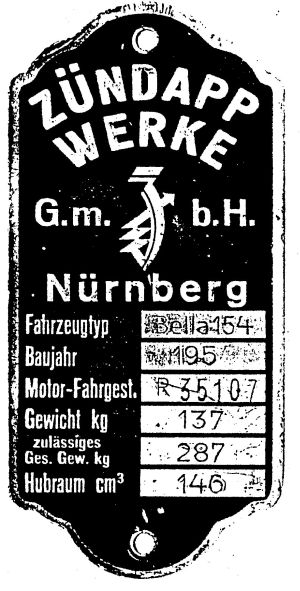
The bike's factory identification tag that was riveted to the top of the engine cowl. It had been painted over with grey house paint.
I spread out all the pieces that were scheduled to be sent away for sand-blasting and took photos of them so I would have a visual record of what should return.

One of the many photos.
The wheels were aluminium alloy and were terribly corroded and discoloured. I bought a brass wire brush attachment for the electric hand drill and set to work on them.
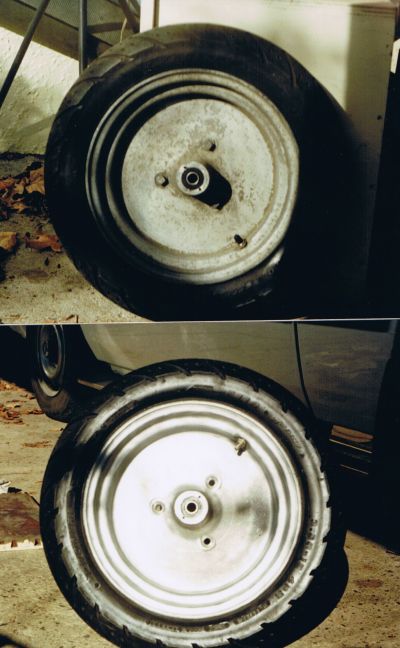
Before and after.
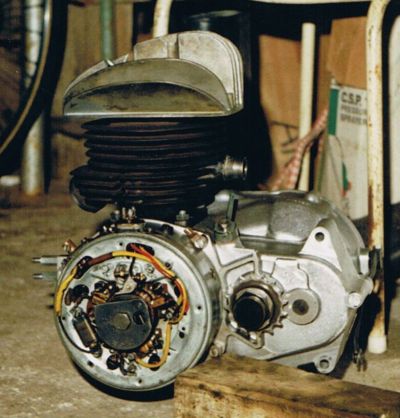
The engine was a mess as I'd never really given it a proper clean - and I suspect that no one else had, either:
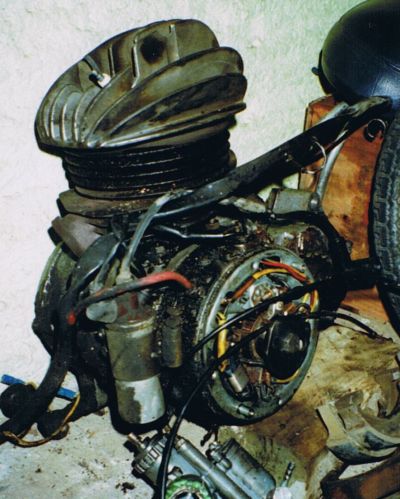
A nearby service station had a coin-operated water blaster that made a world of difference:
Stripping the bike down was the quick part of the undertaking. Financial considerations dictated the pace of the rest of the work.
During the process of stripping the bike I ascertained that the foot platforms had originally been galvanised so I sent them and some smaller pieces off to be galvanised while the headlamp reflector and trim, handlebars, foot brake and gear lever went to be chromed.
Tom McCarron, who had restored a large number of classic motorcycles and cars, agreed to do the panel work (filling unwanted holes, removing dents and straightening out slight twists) and then paint the frame and panels. He looked at the ravaged front fender and asked if I had a spare we could use instead. When I said "no" he said "damn, because it's going to be a c*** to fix."
Tom quoted $380 to do the lot - panel work and painting - providing I paid for the paint. I would have accepted $3000 as a "reasonable price" considering how much had to be done - out of my price range, but reasonable. I was astounded that he only wanted $380 - I guess it was because he loved restoring bikes so much.
He told me to get black Acran for the frame, a cyanide-based paint that only professionals with the appropriate safety equipment are allowed to purchase. If I had not said that I was buying it for Tom McCarron, the shop would never have sold it to me.
I needed automotive enamel for the panels but I had no idea of the bike's original colour (or colours) as the stripping process had revealed many layers of different colours and I was unable to tell what was primer, what was paint and who had painted what. I looked through colour charts and eventually settled on "Loire Turquoise", a Toyota colour. It was greener than the scanned images reveal.
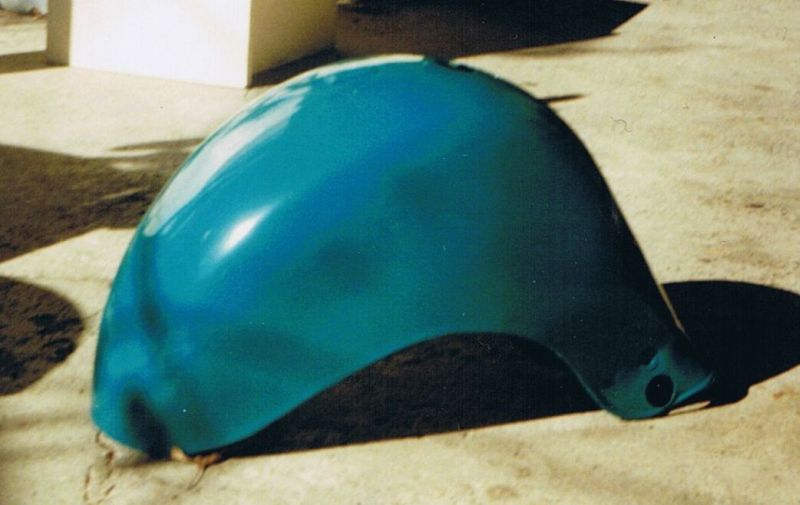
Despite Tom's dire assessment, he restored the front fender to factory condition, removing the dents and repairing the split (which had torn all the way up to the centre when it was being sand-blasted) and a couple of other splits that had been inexpertly mended in the past - "some bastard obviously got given a welding rig for Christmas" was Tom's observation on the quality of the earlier repairs.
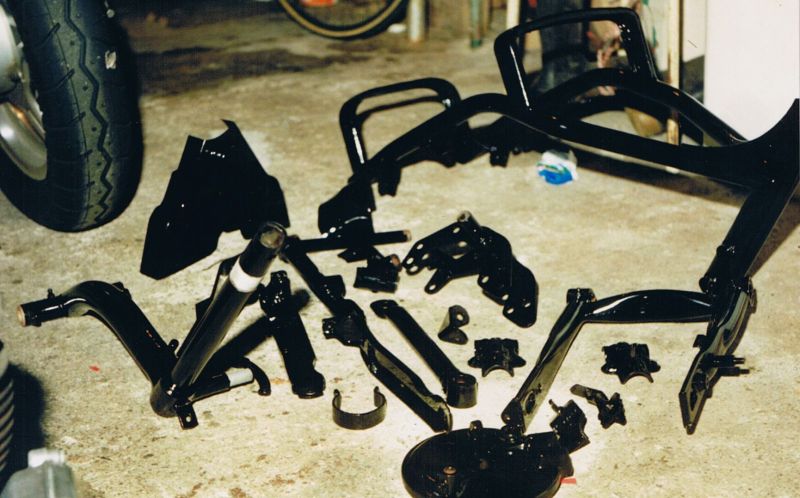
The frame and assorted other bits painted with black Acran.
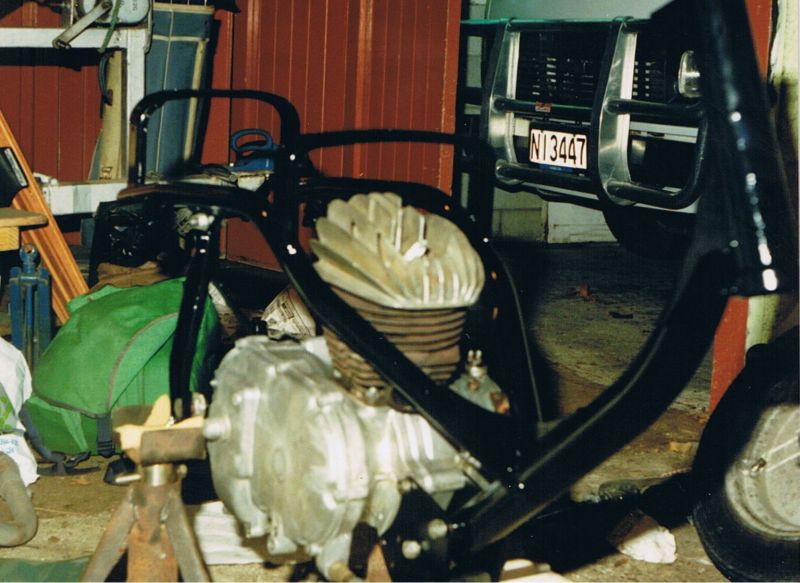
Frame assembled and engine back in place.
In addition to getting the various pieces cleaned then painted, chromed or galvanised, I had a multitude of other bits to replace or get repaired.
The cables for choke (which was mounted on the handlebars), throttle, front brake and clutch were all seriously damaged - broken sheaths and stretched, worn cables. They had ends that were specific to the Zundapp so there were no alternative "generic" parts available and buying new parts was impossible.
I took the remains of the five cables (two for the throttle) down to Proudlock Cycles in Frankton and asked if they could make up a new set, putting the old end pieces on new lengths of cable.
They made up a complete set of cables - measuring what was left of the sheaths to get the right length, making the cable inners slightly shorter to compensate for years of stretch and soldering the original ends onto the cables - and charged me $25 for the lot. I was most impressed with the quality of the work and the price.
My friend, Axel, in Germany went to the Zundapp factory to locate whatever replacement parts he could. Of course, he could get nothing specifically for that model as it had been out of production for years (the staff were stunned to learn that there was still a functional one in existence) but he was able to get some parts that would fit and sent them over.
From Axel I got a new ignition switch, handlebar switches for lights and horn and a couple of badges. Axel loved riding around on that bike when he was in New Zealand so he was almost as enthusiastic about the restoration project as I was.
The RD350 tail light was still the best replacement available but I figured I could improve upon the indicators. As with the brake light, the bike was old enough to be exempt from the indicator requirements but it was my observation (from years of riding the TS125) that even in daylight few motorists noticed hand signals.
I located some oval indicators or marker lights at one of the local Hella stockists for the rear of the bike but I really wanted something decent for the front rather than a couple of lights bolted to the front shield. I located small indicators designed to mount on the handlebars - made to convert off-road bikes to road-legal status.
The bike originally had rubber trim wherever the metal panels joined, to prevent vibration from rubbing the pieces together, so I knew I would have to replace them. The bloke down at Para Rubber kindly let me have a short length of all their various trims and beading for $5 the lot and I took them back to Maureen's house to see what would fit where.
The aluminium trim around the shield was beyond repair and bent out of shape. The front shield had be painstakingly straightened by Tom (and he let me know it wasn't easy) so I had no desire to bend it out of true by slapping the old aluminium bits back on. One of the lengths of beading I had got from Para was the metal-reinforced trim they put around the inside of car door sills to prevent the metal of the door connecting with the metal chassis and I ascertained that it was the ideal size to replace the aluminium pieces.
I measured up the bike and compiled a list of what I needed and in what lengths and returned to Para to make my purchases.
Replacing the factory tag on the engine cowl was a simple matter of borrowing a rivet gun and a couple of standard rivets but the "Bella" badge was an entirely separate challenge. It had been factory-fitted using very fine rivets which I had to drill out to remove it from the cowl. Try as I might, I could not locate suitably small rivets to fasten it back on. Then a friend suggested a jeweller might have bolts and nuts suitably fine to fit in the holes.
I went to a local jeweller and, sure enough, he had some fine bolts and nuts which fitted nicely in the holes in the badge. I bought just enough to do the job and was able to affix the "Bella" badge back on.
The bike originally, according to photos I'd seen of others, had a large flower mounted just below the "Bella" on the front shield but the one for this bike was long gone. Instead, I had a modern Zundapp badge that Axel had sent me from Germany. Installing it was a matter of "peel and stick".

In rolling condition - both wheels in place, front fender, shield (with badges and automotive rubber trim), side stand and foot platforms. Still a long way from running order, though.
Wiring it up. The cables Proudlock Cycles made are in place, as are the switches and ignition that Axel sent me and the front indicators; the tank is in place and the bike is nearly ready.
I located a short strip of metal that had holes drilled regularly along its length so I bolted the brake light switch to the end-most hole and used one of the other holes to attach the metal strip to the frame - not the most elegant means of mounting the brake light switch but a lot more elegant than a length of number 8 wire. The spring from the switch was still attached to the brake rod by twine, however.
Better than Number 8 wire.
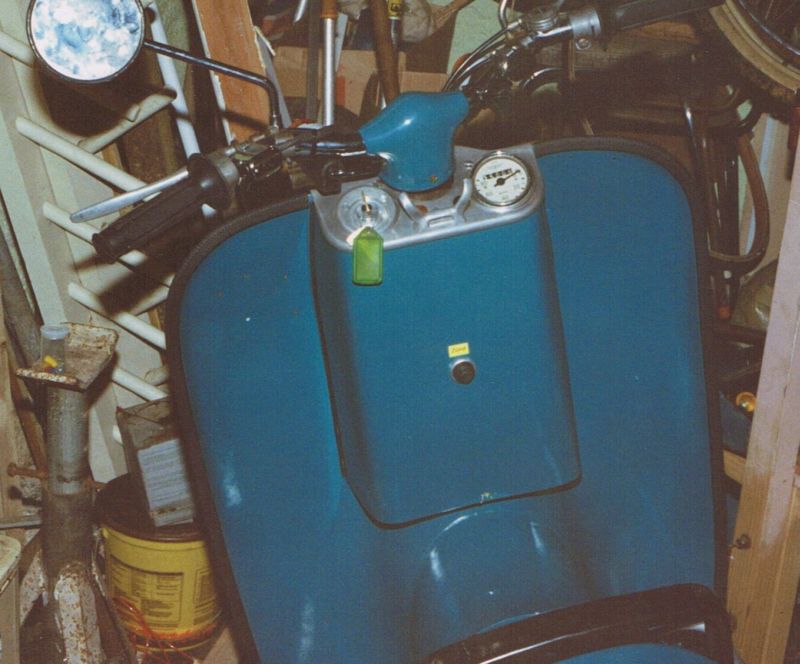
The original cover for the battery cases and electrical system was long gone so this is the one I fashioned from a sheet of aluminium and bent to fit with the assistance of the engineering team at work (I worked at The Waikato Polytechnic at the time). I made the initial shape from cardboard so I could cut bits away with ease and then I used the cardboard shape as a template to mark out the shape on the aluminium sheet. Tom painted it using part of the left-over paint. Rubber beading from Para Rubber protects the front shield from the edge of the aluminium and a spring through a hole at the bottom holds it in place.
The push button in the centre of the cover is a momentary contact switch - the starter button for the electric start. The ignition switch is mounted where the original ignition switch used to be now that the light switch was incorporated in one of the handle-bar switches.
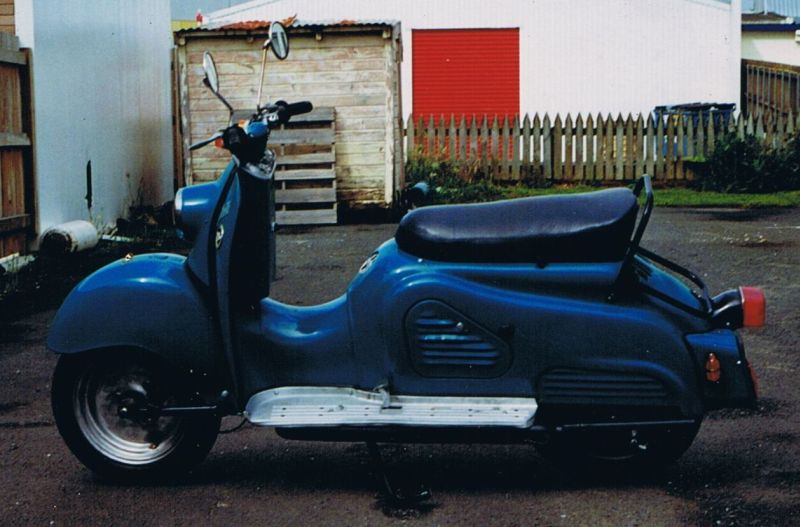
Left side, showing galvanised foot platform, chrome brake lever and the Hella rear indicators. This picture was taken when the bike was back home after completion. Also visible in this picture, just forward of the seat, is the small grille that hinges upwards to give access to the spark plug - in this, Zundapp GmbH showed more foresight than the Suzuki Design Team did when they came up with the LS400 "Savage"...
Right side, looking all shiny and new in the evening sun.

Rear and front views showing that the tool compartment flap is now secure (I never opened it again), the shiny silver of the rechromed headlamp reflector and a clear view of the badges. The front view also reveals that I did not replace the rusted rear view mirrors.
You will notice that nowhere in the above process did I include "cleaning the sand out of the petrol tank", an omission that made the ride to Whangarei and back a lot more adventurous than I had anticipated.
A lot has changed since this project:
I got divorced from Clare, my wife at the time, who shared the adventure of riding to Whangarei. She has now remarried and I see her and her husband at the Toy Run events. Good to see the trip to Whangarei and back didn't put her off motorbikes.
Maureen and I both left the Waikato Polytechnic - Maureen to resume midwife duties, me to seek employment elsewhere.
Most of the technical and engineering staff who assisted with this project are still employed at the Polytechnic.
Tom McCarron, alas, is dead - and is greatly missed.
Axel is married with children in Germany. He came over here with his pregnant fiancée, Bianca, a number of years ago and they very nearly stayed long enough for Maureen to deliver their first baby but in the end they decided to return to Germany.
I sold the Zundapp to someone who had the time and money to keep it maintained to a reasonable level.
I've remarried and my wife and I have had three children - the younger of our sons and our daughter were both delivered by Maureen.
"Bikes 'n' Bits" ceased to be a motorcycle wrecker and became Supacross Cycles then joined the exodus of all-things-motorcycle out to Te Rapa Straight.